Sonadier Forms' Integrations service is a set of scripting methods for using OAuth-enabled APIs. You can attach a facility-wide account, or your users can add individual accounts for services. We'll handle storing the Refresh Token and other sensitive information, and provide you with an Access Token on demand. For more information about the Integrations API, see the documentation. The Integrations system doesn't have any Salesforce-specific functionality beyond properly configuring requests. You must create your requests using the Salesforce REST API.
Setting Up Your Salesforce Integration
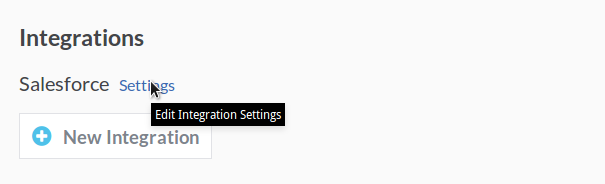
To create a Salesforce integration, click New Integration from your Management page, and change the Integration dropdown to "Salesforce". Save it, and then click Settings next to Salesforce under the Integrations section of your management page.
Setting Up Salesforce Accounts
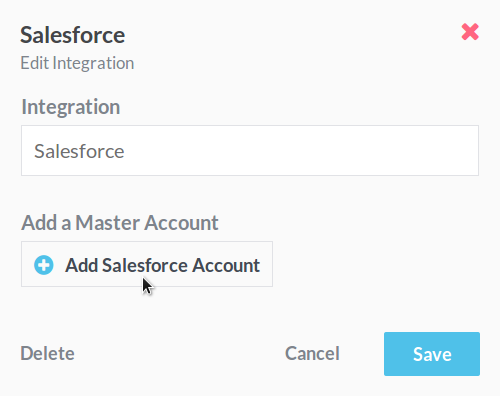
All API requests must be done in the name of an account. Your users can set up individual accounts through their Settings page, under the Integrations tab. You can also set up a single "master" account to be used for all requests from Forms, in order to control permissions. Inside the Salesforce Settings modal that you just opened, you can log in with the account you want to use for all users. API requests will use this account by default if it's present. Your users will be automatically presented with a one-time window to log in with their Salesforce account if you make a Salesforce request from one of your forms.
Allow Requests from Sonadier
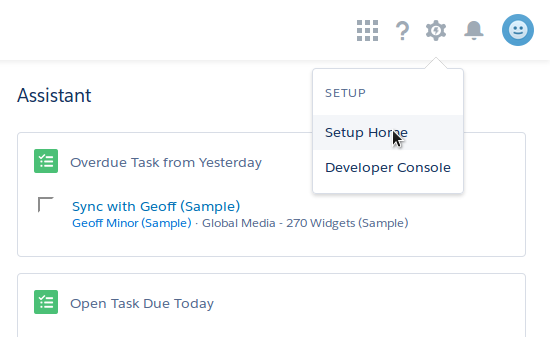
Salesforce enforces Cross-Origin-Resource-Sharing (CORS) restrictions on incoming connections from third-party servers. You can allow us to make requests by opening Setup Home from your Salesforce Homepage. Don't see it? Salesforce has different interfaces depending on your role. Look for a "Setup" option in the top right, then search for CORS in the Quick Find / Search field in the sidebar. If it's not there either, feel free to email us at support@sonadier.com, we're happy to help! If you found it with the Setup option, skip the first sentence of the next section, since you've already gotten to CORS.
Whitelist Forms for CORS
From your Setup Home, click on Custom Code under Platform Tools. In the expanded menu that appears, click on CORS. From the CORS setup page, click on the New button next to Whitelisted Origins. (Note: Not the "Create New View" link!)
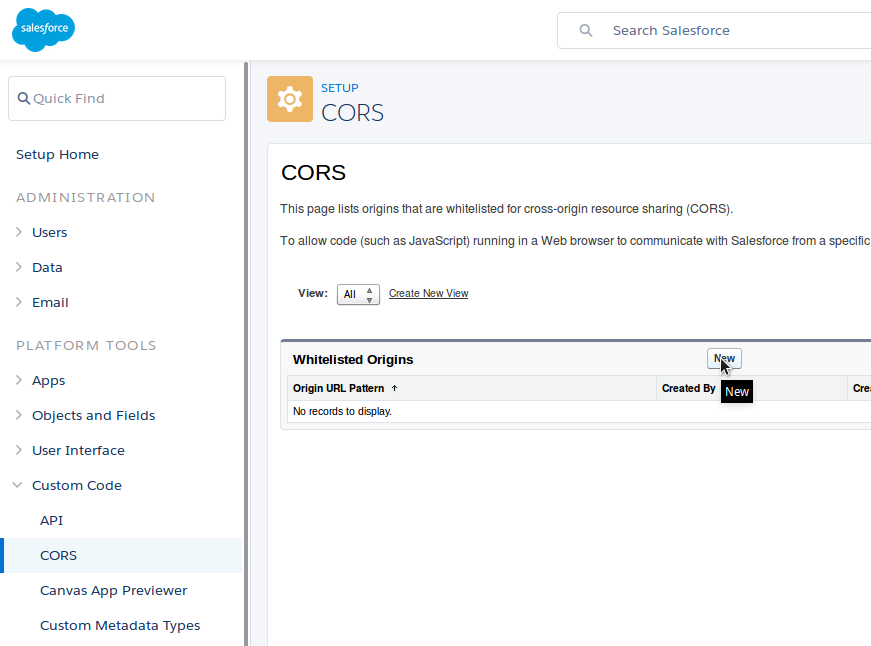
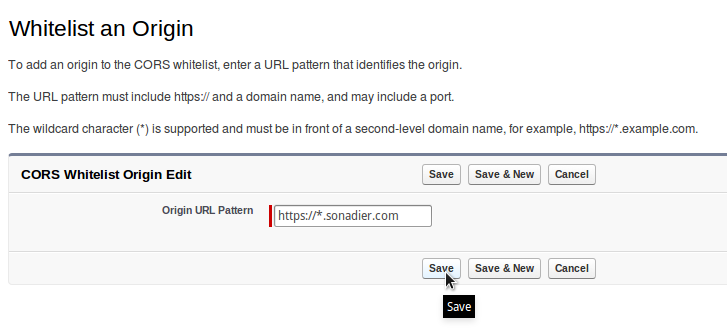
Save Your CORS Whitelist
Enter https://*.sonadier.com in the Origin URL Pattern text box, and click Save. When you've finished this step, Forms will be allowed to make requests normally.
Start Making Requests
Once you've set up either a master or user account for Salesforce, you can make requests from custom scripts or the browser's developer console. For more information on the Integrations API, see the documentation. For more information on Salesforce's REST API, which you'll need to make requests to, see the Salesforce REST API documentation.
/* Check whether an integration is setup. */
Integrations.salesforce.exists();

/* Require your users to set up a Salesforce account, and redirect them if they don't. This is only enforced with frontend javascript. */
Integrations.salesforce.require();

/* Make requests to the Salesforce REST API. The available request types are GET, POST, PATCH, PUT, DELETE, and OPTIONS. The request will be made to the service's base url, eg. https://na22.salesforce.com/services/data/v35.0 and automatically send the access token. */
Integrations.salesforce.get("/services/data/v35.0");

/* Add parameters to your request with the second argument. */
Integrations.salesforce.get("/services/data/v35.0", { param: true });

/* API requests return a jQuery Deferred Object. */
Integrations.salesforce.get("/services/data/v35.0").done(function(response) {
  console.log(response);
});