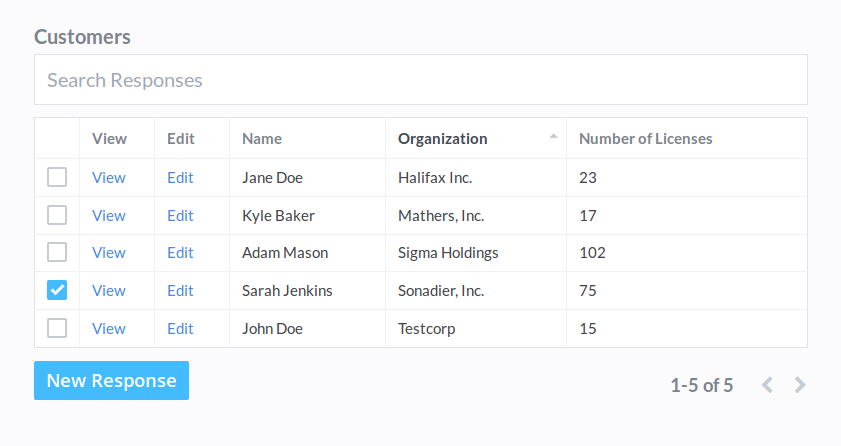
The Connection field type lets you lookup and select responses from a field, instead of using ID numbers or editing your form every time you want to add a new option. For example, you can connect a Customers form to your Orders form to pick directly from your list of customers when you add a new order.
Creating a New Connection
- Open the Form Editor and add a Connection field. In the Customers-Orders example above, we'd open the Orders form since we want to select an order's customer.
- Select the form you'd like to pick responses from with the Connected Form field. In the example above, we'd connect to Customers.
- Save your form.
The connection field appears as a table of responses that can be selected with checkboxes. You can right-click the header of a column and select Hide Column to hide it.
Basic Connection Options
- Required — Require users to fill out the connection before the form can be submitted.
- Unique — Allow a single response to be selected only once. For example, if you will never have two orders by the same customer, you can prevent a customer from being selected twice.
- Only new responses — Require users to create a new response to the connected form, rather than selecting from an existing one.
- Allow multiple choices — Allow the user to select more than one response. For example, if each order can have multiple customers, more than one can be selected.
Showing and Hiding Columns
- From the form editor, select your connection field.
- Open the Edit Table Columns section.
- Toggle the checkboxes next to the columns you'd like to hide or show.
Changing the Response Link Text
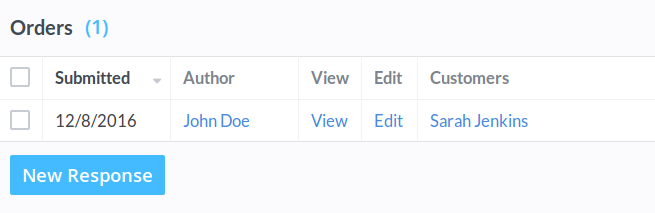
In the table view, responses selected by a connection appear as links. The link's text is the 10-character ID of the selected response by default, but you can use a value from the connected submission instead. In our example above, we'd like the link text to be the customer's name.
- Select your connection field in the Form Editor
- Open the Edit Table Columns section at the bottom.
- Pick a field from the Name Column dropdown.